Arabic Makeup Looks: How To Create Bold Arabic Eye Makeup
5th June, 2026
Bold Arabic makeup is built on three things: structure, contrast, and precision. It’s not about piling on colour, but rather about knowing exactly where each shade goes and why.
I have put together this step-by-step guide to walk you through the exact techniques behind that signature lifted, defined Arabic eye look. Be it that you are a beginner or working your way up, you’ll learn how to layer shadow, shape your liner, and balance the entire face for results that look genuinely professional.
Key Takeaways:
- Arabic eye makeup relies on elongated eye shaping and sharp contrast, not just heavy pigment Eye prep is non-negotiable for both pigment intensity and all-day wear
- Eyeshadow works in layers, building from light to dark for real depth
- The winged eyeliner is the structural anchor of the entire look
- Lower lash line work and dramatic lashes seal the lifted eye effect
What Makes Arabic Eye Makeup Bold and Distinct?
Arabic eye makeup has a clear design logic behind it, and that’s exactly what separates it from other bold eye styles.
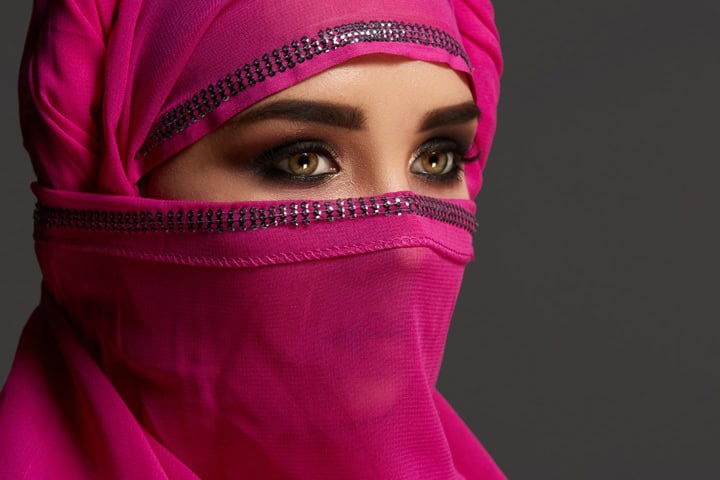
Every element earns its place.
- Eyes are the focal point. Everything else supports the eye, not the other way around.
- Contrast creates drama. A lighter shade on the lid sits against a deep, concentrated colour at the outer corner. That tension is what gives Arab eye makeup its intensity.
- The liner elongates the eye. Rather than simply lining the lash line, the liner extends outward and upward, creating a lifted, almond-shaped illusion.
- Layering is structured, not random. Each shadow has a designated zone: lid, crease, outer corner. They work in relation to each other, not independently.
- Symmetry is built in. Both eyes are treated as mirror images. Any natural asymmetry gets corrected at the liner stage.
That’s why Arabic makeup looks so polished, it follows a particular method, not just an instinct.
Preparing the Eyes for Long-Lasting Impact
Good prep is the difference between a look that lasts six hours and one that fades before midday. Before any shadow goes on, your lids need to be properly primed.
Skipping primer is the single most common reason bold eyeshadow creases and loses shape within hours.
Eye Prep Checklist
- Apply eye primer across the full lid and up to the brow bone
- If no primer is available, use a thin layer of concealer and set it lightly with translucent powder
- Neutralise any discolouration on the lid, this gives your shadow its true colour payoff
- Pat-don’t rub the primer in to avoid pulling at the delicate eye area
- Allow the primer to set for at least 60 seconds before applying any shadow
- For oily lids, press a small amount of translucent powder over the primer before blending shadow
Building Depth with Eyeshadow Layers
Arabic eyeshadow makeup works in zones, and each zone carries a different shade weight. Here’s how to build the look from a clean, primed base.
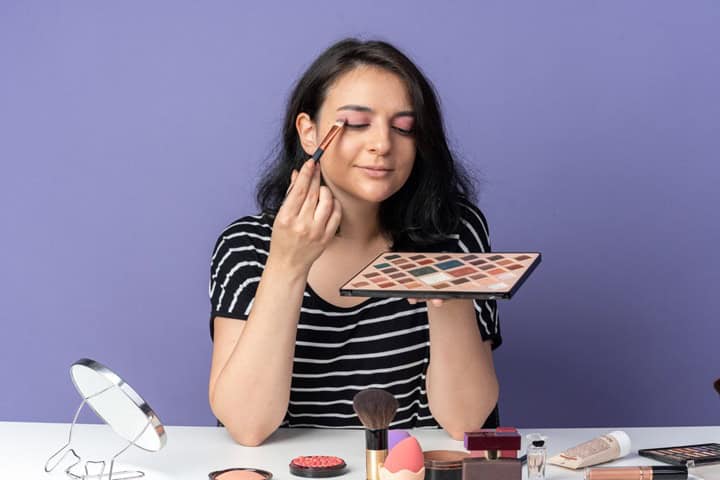
- Lay Down Your Base. Sweep a light, neutral shade. Something like champagne, ivory, or warm beige, across the entire lid from lash line to brow bone. This unifies the canvas and gives everything that follows something to sit on.
- Define the Crease. Pick up a mid-tone matte shadow, warm brown or soft taupe works well, and work it into the crease using small circular motions. Keep the colour concentrated in the socket line, not blended across the whole lid.
- Intensify the Outer Corner. Apply your darkest shade, be it deep brown, black, or a rich jewel tone, to the outer third of the lid. Pack the colour in with a small flat brush, then blend the inner edge gently with a fluffy brush. The outer corner should be noticeably darker than the centre lid.
- Control Your Transitions. Use a clean blending brush to soften harsh edges between your shades. You’re aiming for a seamless gradient, but one that still holds its contrast. Over-blending is one of the most common mistakes at this stage.
- Add Shimmer Where It Belongs. A touch of shimmer or highlight on the centre of the lid and the inner corner adds dimension without undermining the structure. Keep shimmer away from the outer corner, that zone is for depth, not shine.
Pigment quality matters here more than anywhere else. Our high-pigment eyeshadow palettes for Arabic eye makeup give you the intensity and blendability this technique demands.
Creating the Signature Arabic Winged Eyeliner
The liner is the structural backbone of this look. Get it right and everything else clicks into place.

- Map the Wing Angle First. Before drawing a single line, look straight ahead and identify the angle you want your wing to follow. The classic Arabic wing extends outward and slightly upward, using the lower lash line as a directional guide is the most reliable method.
- Draw the Wing Tip First. Start with the tip of the wing, then draw a short line back toward the outer corner of the eye. Establishing the tail first means the shape is already correct before you connect it to the rest of the liner. Starting from the inner corner often leads to inconsistent angles.
- Tightline the Upper Lash Line. Fill in the upper waterline and draw the liner as close to the lash roots as possible. This eliminates any visible gap between the liner and the lashes, one of the hallmarks of a properly finished Arabic eye makeup look.
- Connect and Fill. Draw a continuous line from the inner corner outward, meeting the wing you’ve already drawn. Keep the inner corner slightly thinner, allowing the liner to thicken gradually toward the outer edge.
- Correct for Symmetry. Hold a straight edge, a brush handle works well, against the outer corner of each eye to compare wing angles. If one sits higher or lower, adjust with a cotton bud and a small amount of concealer before the liner fully sets.
For a smouldering finish with slightly more blend-ability than pure black, try creating bold smokey eye makeup looks with a steel grey crème liner, it adds definition without the hard edge.
Enhancing the Lower Lash Line for Drama
The lower lash line is where many people either complete the look or leave it half-finished. It’s worth doing properly.
- Use a smudged kohl pencil along the lower waterline and lash line. Smudge it outward with a small brush rather than leaving a hard edge. This adds warmth and depth without looking heavy.
- Balance top and bottom intensity. If your upper liner is sharp and dramatic, keep the lower line slightly softer. This creates lift rather than weight.
- Extend a small amount of your outer corner shadow beneath the lower lash line at the outer third. This connects the top and bottom of the eye and reinforces the elongated illusion.
- Avoid taking liner all the way to the inner corner on the lower lid. Stopping at the centre, or just past it, keeps the eye open rather than closed in.
Now, if you want the lower lash blending, you could try layering eyeshadow for smoky Arabic-inspired eyes, a taupe powder shadow is particularly effective here. If you prefer a cream base first, start with blending neutral shades for soft Arabic eye makeup and layer powder on top for longer wear.
Lashes That Define the Look
The right lashes take this from a strong eye look to a fully realised Arabic makeup look. Focus on volume and lift rather than length alone.
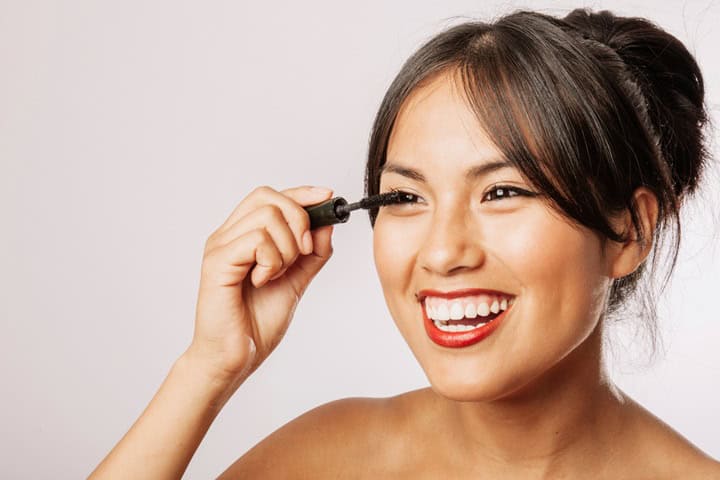
Lash Checklist
- Apply the first coat of mascara and allow it to partially dry before adding a second, this builds volume without clumping
- Choose false lashes that are denser at the outer corner to reinforce the lifted eye effect
- Apply false lashes as close to the natural lash line as possible, a visible gap undermines the whole look
- Once the lash glue has set, run a thin line of eyeliner along the band to blend it into the liner
- Curl your natural lashes before mascara to add upward direction before the false lashes go on
- For a more dramatic outer corner, individual lash clusters work better than a full strip
Balancing the Rest of the Face (Without Competing with the Eyes)
Arabic makeup is an eye-first style. Everything else on the face should support the eyes, not pull focus from them.
- Keep the lips neutral. A nude, soft pink, or warm beige is the right call. A bold lip alongside full Arab eye makeup overloads the face. Save the colour for occasions when the eye look is softer.
- Go light on blush. A soft flush on the cheekbones is enough. Anything too pigmented or shimmer-heavy pulls attention away from the eyes.
- Match your skin finish to the occasion. A matte base keeps things polished and clean. A subtle glow works well for events. Avoid heavy highlight on the nose, it’s a distraction.
- Keep your base seamless. The face is the canvas; the eyes are the art. A clean, even foundation ensures nothing is competing with the look you’ve worked to build.
If you do want to introduce a colour accent elsewhere, adding vibrant colour to statement eye makeup can work, but use it as a subtle accent, not a second focal point.
Common Mistakes in Arabic Eye Makeup
Most issues with Arabic eye makeup come down to a handful of repeating problems. Here’s what goes wrong and how to fix it.
| Mistake | Why It Happens | Fix |
|---|---|---|
| Over-blending removes all structure | Using too large a brush or blending for too long | Use a smaller brush and blend in short, controlled strokes, stop before the contrast disappears |
| Wing sits at the wrong angle | Drawing the full liner before mapping the tip | Draw the wing tip first using the lower lash line as your angle guide |
| Uneven symmetry between eyes | Checking each eye separately rather than together | Step back and check both eyes in the mirror at arm’s length before the liner sets |
| Shimmer applied in the wrong zones | Sweeping shimmer across the full lid without structure | Reserve shimmer for the centre lid and inner corner only, never the outer corner |
| Eyeshadow creases by midday | Skipping primer or applying too much product at once | Always prime first and build shadow in thin, controlled layers |
If you enjoy bold eye work and want to explore further, check out these bold eye makeup looks for dramatic styles.
Quick Step Checklist for Bold Arabic Eye Makeup
Use this before you start to keep your application on track.
- Prime the eyelids and allow to set for at least 60 seconds
- Apply a light base shade across the full lid
- Build mid-tone shadow into the crease
- Intensify the outer corner with your darkest shade
- Blend transitions without losing contrast
- Draw the wing tip first, then connect the liner
- Tightline the upper lash line
- Smudge kohl or eyeshadow along the lower lash line
- Apply mascara in layers and add false lashes if using
- Balance the rest of the face with a neutral lip and soft blush
Conclusion
Arabic eye makeup is one of the most striking styles in beauty, and far more achievable than it looks once you understand the logic behind it. Each step builds on the last: prep supports pigment, layering creates depth, liner defines shape, and lashes complete the lift.
Work through each stage carefully and the results speak for themselves. Once the structure clicks, you’ll find yourself applying it faster and with more confidence every time.
Frequently Asked Questions
What products do I need for Arabic makeup looks?
You need an eye primer, a light base shadow, a mid-tone and a dark eyeshadow, black eyeliner (felt-tip and pencil), kohl for the lower waterline, mascara, and optional false lashes. High-pigment products make a significant difference to the intensity of the finished look.
Can beginners learn Arabic eye makeup easily at home?
Yes, the techniques are learnable with practice. Starting with the eyeshadow layering before attempting the liner helps build confidence. Work slowly and make corrections as you go rather than rushing through the steps.
What is the best Arabic makeup look for weddings or special occasions?
For events, a deeper outer corner shadow paired with a full winged liner and volumising lashes creates the most impact. Adding a subtle shimmer to the centre lid and inner corner gives the eyes a lifted, luminous quality that photographs well.
How do you create a simple Arabic makeup look for everyday wear?
A simplified version uses a light-to-medium shadow blend without a full wing, just a defined liner close to the lash line and a soft lower lash smudge. Keep lashes natural and the rest of the face clean and minimal.
Which tutorials are best for learning Arabic makeup techniques?
Video tutorials that show liner application in real time are the most useful, as timing and hand movement matter. Look for content by professional MUAs rather than heavily edited influencer videos, technique is far clearer when the application is shown without filters or jump cuts.
Hey there! I’m Isabelle Kerrington, and I’m thrilled to share my passion for the performing arts through my blog. Focusing on theatre makeup, my posts will cover everything from product recommendations to helpful tips and engaging tutorials. Join me on this exciting journey as we explore the magical world of theatre makeup together.